
I am linking up to the following parties:


 Since I only had the red sweater, I just mixed it into my current decor. However, think of all the ways you could decorate using a sweater sleeve. Probably not what you were going to use your brain for today, huh?
 Here I used the containers for craft storage. I used the tall container to hold dowel rods and finished paper medallions. The small container is holding paint brushes. (Don't forget that super cute 'Blessings' wooden plaque is for sale in my Etsy shop.)
 If you don't have any tall glass cylinders on hand you can always use a clean Pringles can! I know, genius! Use the short Pringles can for a little depth while decorating. I think this would be cute if a green sweater sleeve was used for St Pat's or a yellow sweater sleeve used for Easter. I think I need to take a trip to the thrift store soon.
 Remember to comment if you like what you see! I love comments!
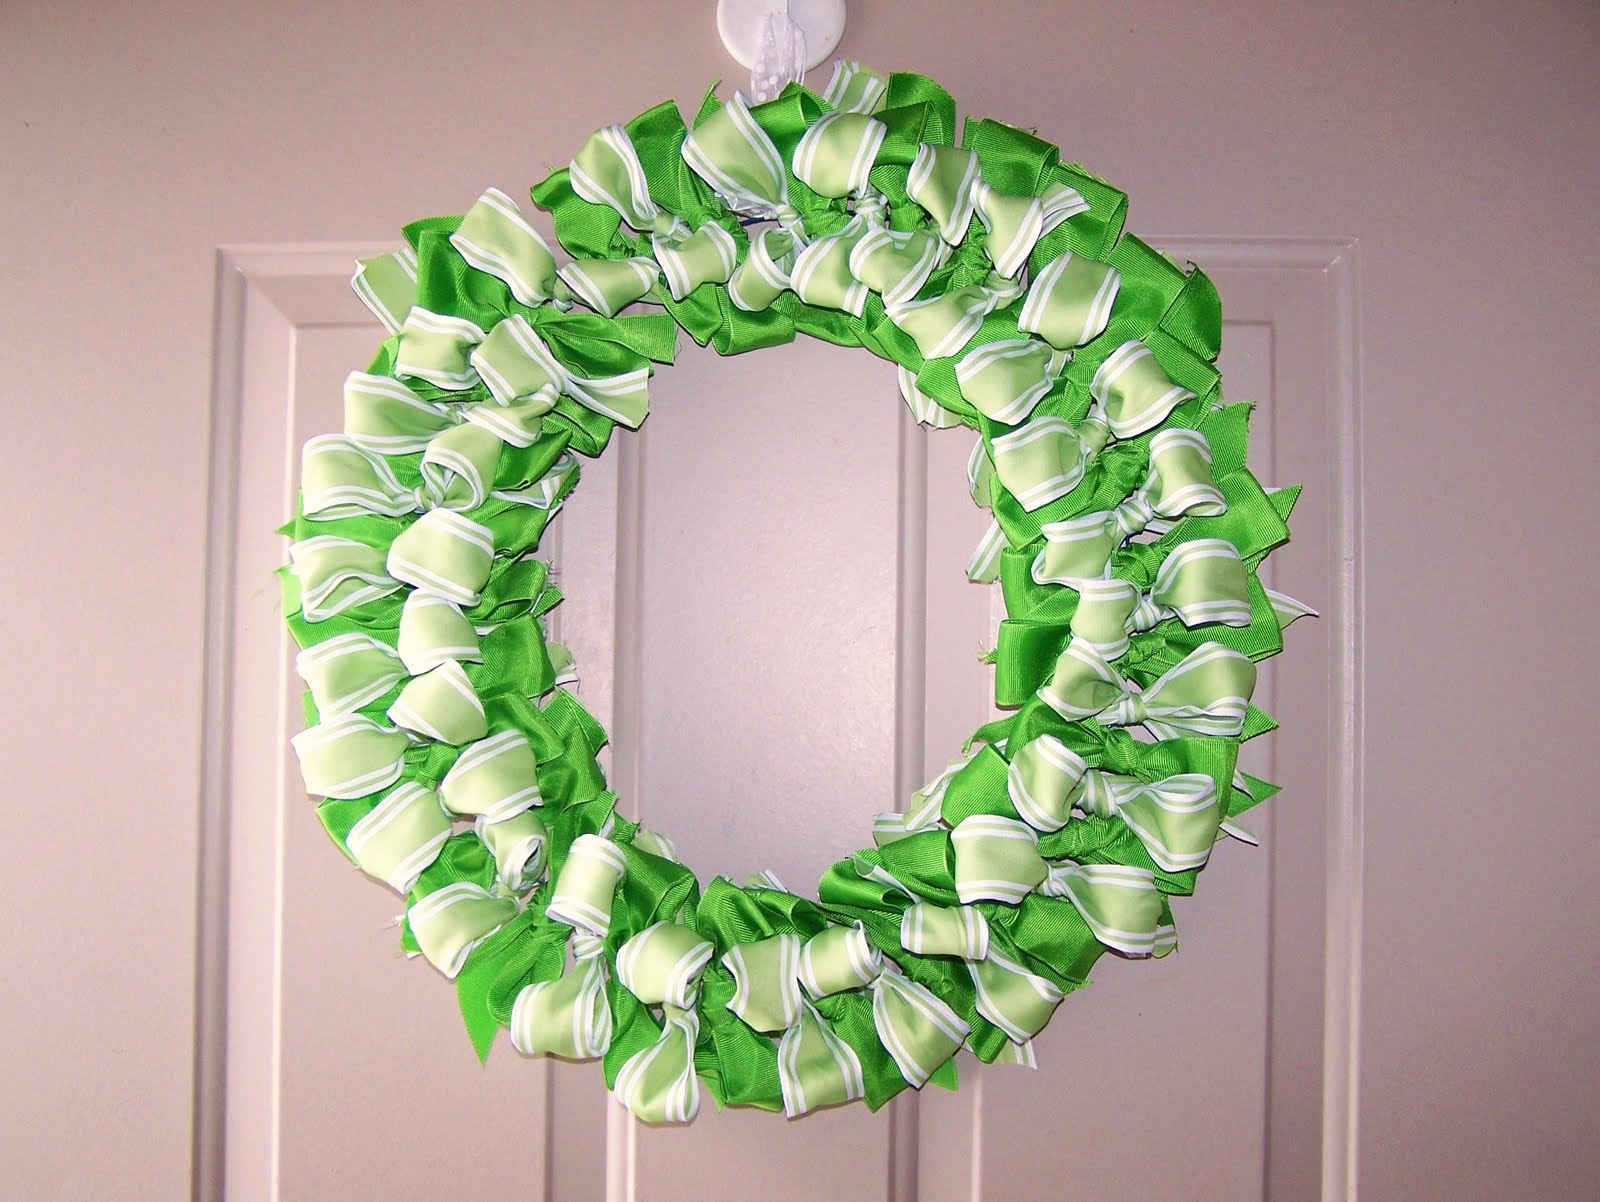 I looked through pages of wreaths before I settled on the simple bow method. I found this tutorial at Home By Sunset. The directions are pretty simple. Use a wire ring or convert an old hanger (as I did) and start tying bows. I got these two huge spools (50 yards)of ribbon at Costco a couple months ago.
 There are 26 bows in each color. It took me roughly 2 hrs to complete. I did have a few interruptions as I do have 4 year old twin boys at home with me. Oh, how I wish they knew how to tie bows (or their shoes).
 In retrospect I would have lined the hanger with florist tape because the flowers do flip slightly when not on a hard surface (like the door). Overall, I am super happy with the wreath. It brightens my day when I drive up to the house and I see it. I will be doing another ribbon type wreath for Easter. I got a super deal on yellow ribbon at Menards after Christmas sale. Yes, Menards!
 This 6 inch Happy St Patrick's Day circle is from How Does She? They do make you sign up your email but it's totally worth it.
 This little cutie is from eighteen25. This is straight off the printer; no trimming, no nothing. Yep, I said, "No nothing." That's my favorite kind of printable.

Isn't it a sparkly, gorgeous treat for the eyes? I hope to make another banner before St Pat's. If you like it, leave a comment. We all love to be loved, right? I am sharing this banner at:
Edit: I added flowers to the banner. I made two different kinds. The first one is the same one I used on my Christmas cards. You can see those here. It is five punched scallops, spritzed with bronze glimmer mist and held together with a brad. The second is five punched scallops too. To make this flower you fold four of the scallops into fourths and glue on. This flower is also held together with a brad. I like the little addition.


 Then it hit me! A mustache valentine. I thought I was a genius. I could cut out little mustaches for the boys and lips for the girls and wrap it around the lollipop. I mean, really, I am so smart. Then I decided to google it make sure nobody else was as smart (i.e. thought of it first). Turn out I am not a genius. I found cute mustache ideas here and here and here. I guess great minds think alike.
What I DID do was make them cute, original tshirts. Using my new best friend (PSE) I made the mustache valentine shirt. I printed onto t-shirt iron-on transfer paper and ironed on. You can download it here. Again, I ask that you leave a comment or become a follower when you download. Thanks!


 On to the towels. I have a house full of males and my cutsey, flowery decor is barely detectable. I have seen ruffles all over blogland lately. I really wanted to do something with ruffles but didn't know what.
  I started by ruffling a ribbon I had. It went ok. I don't have a ruffler foot for my sewing machine so I just did a straight stich down the middle and pulled the thread until the ribbon resembled a ruffle. I liked it but thought it was too blah to put on anything. Then it hit me!
 I have had these super soft and plush Tommy Hilfigar towel in my stash for-evah. I just needed the right project. I gathered up some fresh and some old fabric and went to work.
 I love that they are fun and frilly and can be used for Valentine's day or for spring. I would use them in a feminine (very) bathroom. I'm even thinking about using them as decor in my kitchen.
 I love them! (It seems I love everything I make.) :) If you'd like to purchase one they are in my etsy shop. BabsMadeIt. Convo me on etsy or leave a comment here and I'll give you a 20% off code.
 We still have a full blanket of snow on the ground so I didn't feel bad using my holiday paper. The adorable snowmen and polka dots are from My Mind's Eye. These are not double sided papers so I had to glue them together. I'll tell you more about that later.
 This paper is double sided. It is from K&Company. The 'thank you' is cut from cardstock and then I used modge podge & glitter to make it sparkle.
 Here's and inside peek at the markers. I love that it holds them perfectly and it can stand up and be a decoration as well as a gift.
 Now, this is why you want to use double sided paper. It is not so pretty inside. Here's a quick 'how to':
 Here's what I had left of this sweater. First, I made pillow covers and then I made the sweet little flower pom barrette. I had the entire sleeve left and I HAD to do something with it.
 I did a super simple pattern: I traced around my hand. I cut it on the seam so I only had to sew up one side. I did the same with some leftover fleece I had. Here you can see the inside.
 What mittens wouldn't be complete without a couple of fabric rosettes?
I am very happy with how they turned out. The sweater is not felted so they won't hold up to our Wisconsin snow but they'll make great driving mittens.
Note: Since making these little guys I been informed of a video tutorial to make super cute felted mittens. I will be trying that next! Here it is, if you'd like to give it a shot. There's even a hand drawn mitten pattern.

I just got PhotoShop Elements for Christmas so while I'm learing how to use it Iuse Picnik to make the banner.

So, what do you think? I love comments.
 I made my first Valentine card last night. I really struggle with cutting the beautiful paper. I never want to make the first cut and mess it up. Ho hum. I used We R Memory Keepers Be My Valentine collections and American Crafts ribbon.
  The pink paper is from DCWV the "HUG" letters are from K&Company. The hug was also cut using the Lyrical Letters cartridge on my Cricut Expression.
  I love these hearts. They are whimsy and fun. I cut them with the Cricut Home Decor cartridge and used Glimmer Mist in Tattered Leather to get the brown aged color. I am loving Glimmer Mist. I spritz on just about anything I can.
  Lastly I used crepe paper streamers to make the ruffle. They were white before I spritzed it with the Glimmer mist.
  I'm very happy with the outcome. It's not too cutesy or too pink.
 I cut 3 inch round circles from one sleeve. I used 9 circles; one for the base, 8 for the pom. I folded them in half and then in half again and hot glued it to the base.
 I then cut a rectangular(ish) piece of felt and hot glued the pom to it. I got the barette at the dollar store, 6 for $1.
 These would be cute pinned to a purse, a scarf, a sweater, shoot, just about anything! Let me know if you decide to make one of your own.
 Don't these PB knit pillow covers look super warm and comfortable? I think they do but the price tag was too steep for me. I made my own using thriftstore sweaters. Each sweater was $4 and I already had the pillow inserts. I am in the mood to decorate for Valentine's day hence the red and pink.

 I, of course, had to put a sweater rosette on it too. It just adds a little sass to it. Enjoy!